
Learn about your Verifone® VX 520
Have a quick question about your Verifone® card reader? Check out our online tutorials, how-to instructions and reference guides to get the answers you need.
Quick help
See an error message on your card reader? You can troubleshoot it with a simple search using our Error Message Help.
Online tutorials
- Verifone – Process a Sale (PDF)
- Verifone – Process a Refund (PDF)
- Verifone – Process a Void (PDF)
- Verifone – Reporting and Settlement (PDF)
Reference Guides
- Verifone Quick Reference Guide (PDF)
- Countertop Quick Reference Guide (PDF)
- Petroleum Fleet - VX 520 Quick Reference Guide (PDF)
- View, save and print the Statement Reader Guide (PDF) for help with your statement.
- View a list of Statement Fees Definitions to learn why certain fees may appear on your statement.
Getting started & basics
- Select a location for the card reader near a power outlet and an Internet router, modem or wall jack that is convenient for the operator and offers adequate ventilation and protection for the equipment.
- If you’re using the charging base for the Bluetooth card reader, follow the same instructions to connect the base and select a location.
- If you’re connecting your card reader to a telephone line, plug one end of a standard telephone cord into the phone port on the card reader and the other end into your telephone wall jack. Note: For optimal performance, we suggest using the provided phone cable on a dedicated phone line, and not connecting through a splitter.
- If you’re going to use an Internet connection, plug one end of an Ethernet cable into the card reader's Ethernet port, which may be labeled as "ETH" or "10Base-T." (These cables are very common and are technically named "Cat5 cables.") Plug the other end into your router, modem or Ethernet wall jack. Note: You can connect both Internet and phone cables to the card reader, so that your card reader can automatically switch over in the event of Internet connectivity problems.
- Make sure one end of the power cord is plugged into the adapter and then plug the other end into an indoor outlet.
- Attach the small plug on the adapter cord to the power port on the rear of the card reader. Note: It's important to never plug a PIN pad into a powered-on card reader – it could damage the equipment. For assistance connecting a peripheral PIN pad to your card reader, please contact the Verifone Help Desk at 1-888-886-8869.
Insert: If the customer has an EMV chip card, and your card reader is enabled to accept EMV transactions, the customer should insert their card into the card reader's chip card slot, which is on the front of the card reader, beneath the colored keys.
Swipe: The customer can swipe their card down the magnetic-stripe reader on the card reader's right side.
Tap: If the customer has a contactless payment instrument, such as a contactless card or a mobile wallet on a smart phone, then they should tap or wave it directly over the card reader's display screen.
Manual entry: Key the card number into the machine if the card or card reader does not accept the other methods; however, this could cause the transaction to downgrade and incur a higher interchange fee. Learn more about interchange here.
Note: Steps may differ slightly if you're using a separate PIN pad with your card reader.
Manually keying in a sale (card-not-present transaction)
- Select Sale from the main menu.
- Enter sale amount using keypad and press Enter. If prompted to pass terminal to customer, bypass by pressing Enter again.
- When prompted to Tap/Insert/Swipe/Key, simply enter the card number using keypad.
- Enter card expiration date, then Enter.
- Enter CVV security code, then Enter.
- Enter customer Zip code associated with the cardholder’s address. When you hit Enter, you’ll see Dialing/Connecting…
For VX520 - View online tutorial (PDF)
A void allows you to cancel a transaction in your current (open) batch. View online tutorial (PDF)
- From the main screen press [F4] to select Void.
- To void the most recent transaction, press [F1].
- Review the transaction and once confirmed, press [F1] again to void it.
Voiding a different transaction:
- Search for it by pressing [F2].
- Press [F1] to search in the current batch of unsettled transactions. Press [F2] to search for authorization-only transactions.
- Once you've selected the proper batch of transactions:
- a. Press [F1] to search by invoice number.
- b. Press [F2] to search by account number.
- When the transaction detail displays, review the transaction and once confirmed, press [F1] to void it.
If tip processing is enabled for your card reader, then you can perform tip adjustments on transactions in your open batch.
Press the second purple hot key from the left to open the Tip Adjust menu.
- There are several ways to identify the transaction to be adjusted.
- To search using the clerk/server ID who entered the transaction, press [F1].
- To search using the amount of sale, press [F2].
- To search using the last four digits of the customer's card number, press [F3].
- To search using the invoice number (printed on the receipt), press [F4].
- When the transaction detail displays, confirm it’s the correct transaction and press [F1].
- Enter the tip amount, press [Enter] and you'll be done.
Note: You can only add a tip to transactions in your current (open) batch.
If the Tip Adjust option isn’t available on the screen, call the Help Desk at 1-888-886-8869 to discuss modifying your setup options to add tip processing.
Press the purple hot key furthest to the left to scroll down.
- Press [F3] to select Reprint.
- To reprint the receipt for the most recent transaction, press [F2].
- To reprint the receipt from a different transaction, press [F3] and type in the invoice number for the receipt.
- Press the green [Enter] key when you're finished.
A settlement operation is used to close out the current (open) batch of transactions and start a new batch. The closed batch is then submitted to Chase to begin the funding process.
Your Verifone card reader uses a Terminal Capture System (TCS), meaning it stores transactions throughout the day and sends batch totals of sales and refunds to Chase after the close of business. There are two settlement options:
Manual settlement – Press [F3] to select Settlement from the main menu, and then follow the prompts.
Auto settlement – Transactions will automatically settle in the current batch at a specific, predetermined time, within a 24-hour period.
For example, you set Auto Settlement for 10 p.m. After your business has closed for the day, then every day at or after 10 p.m., any unsettled transactions in your batch will automatically be submitted for processing. This will occur as long as your card reader is powered on and connected to an available phone or Internet service.
At the end of every batch settlement, a settlement report automatically prints from your card reader. Review any settlement printouts to confirm the batch settled successfully. To change your settlement option, call the Help Desk at 1-888-886-8869.
Your Verifone card reader offers several reports that help you view details and summaries for the transactions in your open batch.
Press the purple hot key furthest to the right to view the Reports menu and select a report to research your sales figures.
Running card reader reports doesn’t settle your batch or in any way alter processed. Resource Online features the Instant Dashboard for an at-a-glance view of your daily sales and settlement figures from any computer.
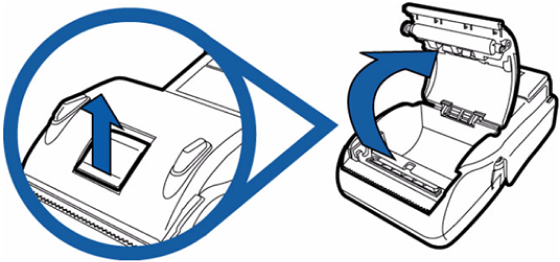
- Gently pull the latch located on the bottom of the card reader to unlock the paper cover.
- Lift the printer cover up and back.
- Loosen the glued leading edge of the paper or remove the protective strip from the new roll of paper. Unwind the paper roll past any glue residue.
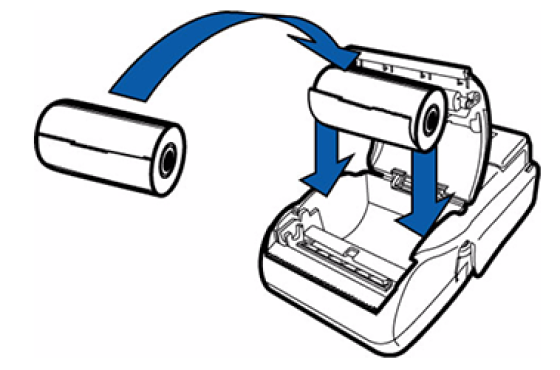
- Hold the roll so the paper feeds from the bottom of the roll when the card reader is facing you.
- Drop the paper roll into the printer tray inverted.
- Pull paper up past the glue residue on the paper roll.
- Close the paper roll cover by gently pressing directly on the cover until it clicks.
- Tear the paper off against the serrated plastic strip in the printer.
If receipts are not printing and a "no paper" error displays on your card reader:
- Open the paper compartment.
- Remove the paper roll and check for any jammed paper.
- When finished, replace the paper roll and close the compartment.
If the paper advances from the printer during transactions but is blank:
- Make sure you are using thermal-sensitive paper, not plain paper. You can verify this by running your fingernail down the side of the paper – it should leave a line.
- Make sure that the paper roll is loaded so that the paper feeds from the bottom of the roll.
Note: The admin password may be required in order to update the date and time.
- Press the star key to ensure you are at the operating system home screen. Then press [F2] and [F4] at the same time. If prompted, input the Terminal password and press Enter.
- To Change the time, press the far left purple key to scroll down and use the number pad to press the option that correlates to Clock, then press the Edit Time option.
- Using Military time, type six digits comprised of a two digit format: hour, minutes, and seconds, and press Enter. Press Cancel if the Time and Date appear on the screen.
- To Change the date, use the number pad to press the Edit Date option.
- Type six digits comprised of the two-digit month, day and year, then press Enter.
- The terminal screen will display the current Time and Date.
- Press Cancel until the restart option displays, then using the number pad, press the number that correlates to Restart, this will restart the terminal and return to the idle prompt.
How to get additional help
If you’re still having technical trouble, have a question about fees or need general support for your existing processing account, you can call 1-888-886-8869. Please have your merchant ID ready for verification.
The products and services found on www.merchantservices.chase.com are intended for approved U.S. merchants only and comparable products and services may not be available for non-U.S. merchants. For information on non-U.S. products and services, please visit our other sites at www.chase.ca/merchantservices and www.jpmorgan.com/europe/merchant-services. All U.S. merchant services are provided by Paymentech, LLC ("Chase"), a subsidiary of JPMorgan Chase Bank, N.A.
If you have accessibility issues with the attached documents and require further assistance, please contact the Help Desk @ 1-800-934-7717 for further support.
If you think you’re on the wrong page, explore other Chase for Business support topics at the link below.