Process Smart Terminal Transactions
Get details on managing transactions, including payment processing, looking up past transactions, and more.
Transaction support topics
Get answers to the questions most frequently asked by business owners like you.
Getting paid
Funds may be held for a variety of reasons, including protecting against fraud and exceeding deposit limits.
Fraud: To protect against fraud, some transactions may require additional validation. Chase may hold funds and request documentation from you to ensure the transaction is legitimate. If additional documentation is required you will receive an e-mail from WePay.com with the subject line “Additional information needed to resume payouts for your QuickAccept account”. Once the documents have been reviewed and the transaction is approved, Chase will deposit the funds into your account.
Deposit Limits: Limits are set at the account level and differ by a variety of factors. Funds may be held when the deposit amount exceeds a deposit limit set by Chase. Deposit limits cover potential chargebacks, returns, unshipped merchandise, refunds, and/or unfulfilled services and act as a buffer between the time payments are processed and the time you can access these funds, in order to mitigate the risk of making funds accessible immediately.
If you experience a funds hold and have a question, go into your Chase Online Business portal transaction history, choose the transaction and view details. Under view details choose “Report a Problem” and complete the form. Be sure to use the email address used to open your Chase checking account.
- Smart Terminal payments completed before 8 PM Eastern Time Sunday through Friday will be deposited into your Chase Business Checking account by 12 AM Eastern Time.
- Smart Terminal payments completed before 8 PM Eastern Time on Saturdays will be deposited into your Chase Business Checking account by 7:30 AM Eastern Time Sunday morning.
- Any Smart Terminal payment completed after the daily cut off time will be deposited the next day.
The deposit limit is evaluated on a regular basis, and may be raised or lowered at any time, based on your payment history.
If you would like the deposit limit adjusted outside of the normal monthly evaluation, open a support ticket and send documentation when requested.
Use these guidelines when opening a support ticket:
- Enter the email address used when you opened your checking account
- Choose “Quick Accept” from the “What can we help you with” drop down box
- Do not enter any other personal information such as your checking account number
Individual transactions may require additional information to ensure they are not fraudulent. This type of review protects you and Chase and can easily be resolved by you sending a receipt when requested. If, on occasion, your weekly payments exceed a threshold established for your business, Chase may hold the funds amount over the threshold, again, to validate activity. This happens very rarely.
If you have further questions, go into your Chase Online Business portal transaction history, choose the transaction, and view the details. Choose “Report a Problem” and complete the form. Be sure to use the email address used to open your checking account.
For each Smart Terminal transaction, fees are subtracted from your total before you receive your deposit. No additional transaction fees will be charged at the end of the month. To see the deposit amount and any adjustments and fees, go to the Chase Merchant Dashboard in your online account.
No, currently Smart Terminal is only available to clients with a social security number. If you used an ITIN to open your CBCB account, you will not be able to use QuickAccept at this time. If you have already processed a transaction, please open a Support Ticket for assistance.
At this time merchants using Smart Terminal can process international credit cards using the Swipe, Dip, or Tap methods of entry on the Smart Terminal. For manual entry transactions only cards with a US-based billing address can be used.
Checkout Experience
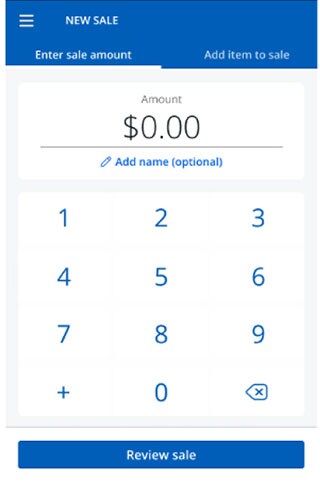
Here’s an overview on how you can create a payment authorization within the Smart Terminal App. Here are the steps to follow:
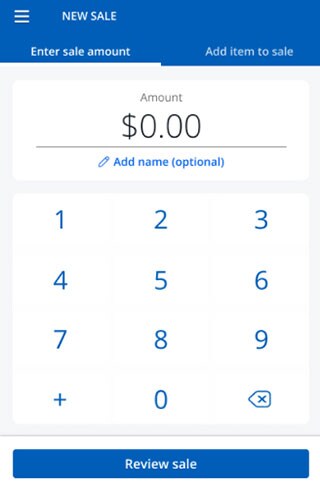
- Sign in to the Smart Terminal App - the New sale screen will be displayed.
- Tap in the Sale Amount (Note: Sale Amount can't be less than $1.00 or greater than $750,000.00).
- Tap the Review sale button at the bottom of the screen to display the Review sale screen.
- Tap the Edit sale button to change the sale amount
- Verify or change the Discount if that option is enabled in Settings
- Verify or change the Tax if that option is enabled in Settings
- Add a Reference code if that option is enabled in Settings
- If Tip is turned on the Customer Verification screen is displayed.
- Enter the TIP %, Custom tip, or No tip and tap the Authorize button at the bottom of the screen to display the Checkout screen
- Choose Check out, once the card reader screen appears, ask the customer to swipe, tap, or dip their card.
- If the transaction is approved.
- The Customer Signature screen will be displayed if that's configured. Sign and tap the Done button at the bottom of the screen
- The Customer Receipt screen will be displayed.
- From the card reader screen, choose Manual Entry
- Enter the Card Number, Expiration Date (MM / YY), Zip Code, and CVV2
- Choose Confirm
Yes. From the Accept a payment screen, users can choose credit/debit, cash or other.
Yes. Change due, if necessary, will calculate and display based on the cash payment amount.
If credit/debit or cash weren’t selected, then other should be chosen for any other method of payment.
Yes. Select the Sales activity option to see a history of all transactions, regardless of method of payment.
Once a user has created an item, it can be added to an order at checkout
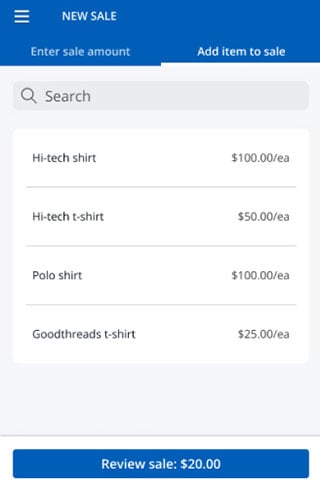
- Choose Add item to sale to start a new sale
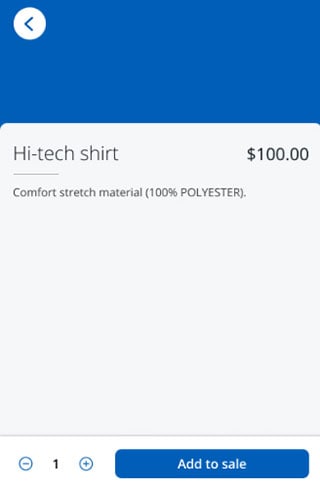
- Choose an item from the Catalog and edit the quantity as needed
- Add more items to the sale if desired, choose Review Sale
- Sales tax and discounts can be applied before choosing Check out

The printed receipt will provide your customer with an itemized receipt at the time of their purchase.
NOTE: At this time, email receipts and duplicate receipts don't provide the itemized details.
You can also provide discounts to specific products and line items.
Users aren't required to set up a Catalog in order to use Smart Terminal to process transactions.
- Choose Enter sale amount to start a new sale
- Enter the sale amount of the item
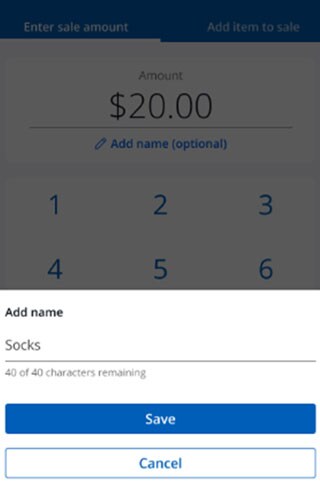
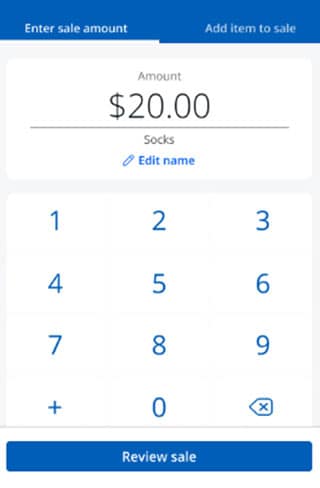
- An optional name for the item can be added
- Choose the keypad’s + button to add more items to the order or choose Review Sale
- On the Review Sale screen, apply the tax and any desired discounts
- If on-screen tips are enabled, have the customer supply the desired tip amount
- Choose Check out, once the card reader screen appears, ask the customer to swipe, tap, or dip their card.
- Tap the card at the top of the screen
- Insert the card in the slot at the bottom of the screen
You can now provide receipts via emails, SMS text, or printed receipts. All receipts are itemized based on the product catalog selections made.
Chase stores the consumer’s contact information to send you digital receipts quickly, speeding up the checkout experience. We collect information during checkout at any Chase merchant.
Consumers can opt out of this service at any time by clicking the Manage Receipt Options link found on the digital receipt.
Merchants cannot access your information, and it isn't visible during checkout. The information is masked for the consumers protection. Details about how we can protect your data are available in our Privacy Policy.
Chase uses the contact information to send you digital receipts quickly, speeding up your checkout experience. The contact details were provided during a previous checkout experience.
No, the contact information is stored to provide a smoother process when using digital receipts. The merchant does not have access to the consumer details and the contact information is masked throughout the checkout experience.
Details about how we protect the yours and your consumer’s data is available in our Privacy Policy.
Consumers can opt out of this service at any time by clicking the Manage Receipt Options link found on the digital receipt.
As a merchant, you can tap the link Why am I seeing this customer’s info? and select the Delete & Don’t store option. This will delete existing consumer information and prevent any further details from being captured.
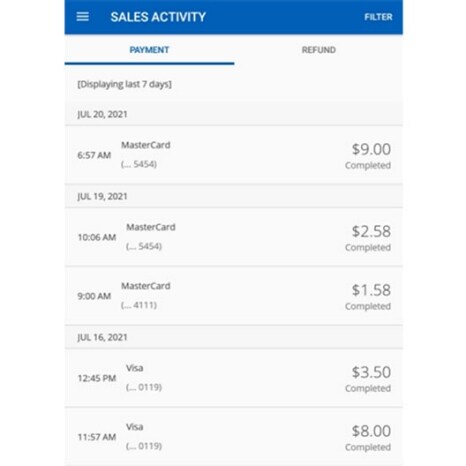
Payment activity
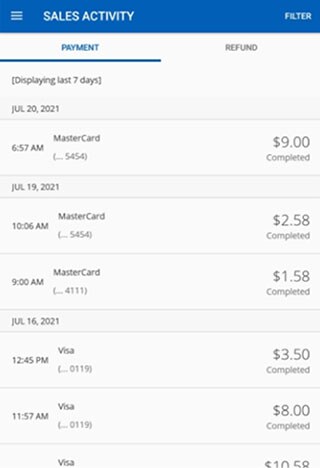
You can see your merchant transaction history summary directly within the Smart Terminal App. Here are the steps to follow:
- Sign in to the Smart Terminal App; the New Sale screen will be displayed.
- Tap the navigation icon in the upper left corner of the New Sale screen.
- Tap Sales Activity to display the Sales Activity screen.
- Transactions will be displayed using the default or previous filters – Date, Amount, Reference Code, Transaction.
- To see or change filters, tap Filter in the upper right corner of the Sales Activity screen.
- On the Filter screen you can change one or more of the filters - Date, Amount, Reference Code, and Transaction.
- Tap the Apply filters button at the bottom of the Filter screen.
- To clear all filters, tap Clear on the Filter categories row at the top of the Sales Activity screen.
Step 1:
Find transaction – filter and choose the transaction
Step 2:
Tap Duplicate receipt
Step 3:
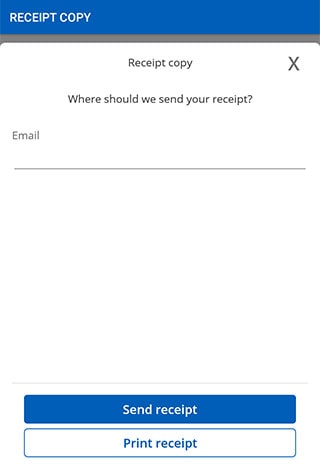
If you would like to send an email, enter the desired email address and client Send receipt. Otherwise, choose Print receipt
You can only add tips to a processed transaction if you are set up to be collecting Tips on Receipt (See Merchant Settings in the Activating your terminal section).
Transactions that require tip to be added are marked as “pending” in the Sales Activity transaction list. If tip isn't applied within 24 hours of the transaction, the transaction is automatically closed with a $0 tip being applied.
Once a tip has been applied, updates or changes on that tip amount are no longer available.
For those pending transactions that require tips to be added:
Step 1:
Locate the transaction within the Sales Activity section
Step 2:
Choose Add tip
Step 3:
Enter the tip amount
Step 4:
Confirm
Step 5:
Complete the transaction
The reference code is an optional field you can add to a sale to further categorize your transaction, for example, Sales promotions, Marketing offerings, Invoice or PO number, etc.
For Smart Terminal app transactions, the timing of the POS transaction capture is determined by the Tips setting.
- If Tips is chosen as Off or On screen the Smart Terminal transactions will be automatically captured in the background immediately after successful POS authorization transactions.
- These transactions will be displayed with Completed status
- If Tips is chosen as On receipt the Smart Terminal transaction capture will be delayed until the transaction Tip amount is adjusted on the Transaction detail screen or 24 hours has elapsed after the initial POS Authorization transaction date/time
- These transactions will be displayed with Pending status
Note: Funding of a transaction won't occur until it's Completed
You’ll need to contact the Chase Smart Terminal support team for assistance in diagnosing the cause and resolving the issue. Contact our customer support team at 888-659-4961. They are available Monday through Friday from 9AM - 8PM EST. For weekend or evening support, email us at smartterminal.support@chase.com
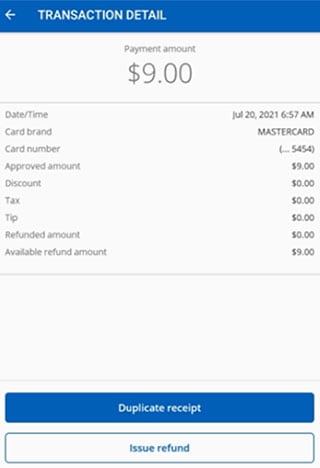
Refunds and reporting
1. Find Transaction:
Filter and choose the transaction
2. Find Transaction:
After the transaction has settled, merchants can perform a refund
Note: Option only available for 60 days
3. Refund Amount:
Full or partial refunds can be issued; the refunded amount is tracked and can't exceed the original sale amount. Minimum amount $1.00
4. Refund Activity:
See your recent refunds in the Sales Activity
No. Card-based refunds can only be applied to the original card. Cash or other refunds should be issued in a way the merchant chooses.
You can only void (or cancel) a Pending Tip (not yet settled) transaction. Transactions that have been settled require a refund to be issued. On the Transaction Details screen you'll see the option to Void if available. This will be replaced by the option to refund if that's available.
- Tap the hamburger menu in the top left of the screen. This will open the navigation menu for the application.
- Choose the option Tip Report, this will show a breakdown of tips collected by each employee.
- The tip amounts collected are further broken down by the payment brand.
The Tip report can be seen by any of the merchant’s Smart Terminals, and includes the tip amounts from any terminal associated with that merchant account. The report can also be printed by the receipt printer for offline record keeping.
Managing disputes
A dispute happens when a customer formally reports that a charge on their card wasn't legitimate. When a customer disputes a charge, the customer’s payment is reversed while the case is being reviewed. Disputes are initiated by the customer through the bank that issued the card. Your customer may have filed a dispute because they:
- Didn't receive a product or service
- Doesn't recognize the charge or payee on their statement
- Believe the product or service was defective, damaged, or not as it was described
- Were a victim of fraud — their credit or debit card was stolen or used without their consent
- Were charged twice
You'll be notified when a dispute claim has been made and we don’t have the documentation needed to challenge. You have a limited time to send proof that the charge was legitimate. Because of the time sensitivity, it's best to monitor your account online frequently. Most card networks allow customers to dispute payments for up to 120 days after the transaction took place, in some cases up to 540 days. American Express® allows customers to dispute payments at any time.
Chase will notify you of the dispute through email. You can also see the dispute on the Smart Terminal Dashboard.
When a customer disputes a charge made on their card, the bank that issued the card credits the cardholder and the payment brand credits the issuing bank. The disputed amount is temporarily deducted from your next settlement while the claim is being reviewed. If there aren't enough funds in your next settlement, the amount is deducted from your Chase bank account.
See the status of your dispute on Chase Merchant Dashboard in your online account. You'll receive an initial e-mail notification informing you of the dispute details. Carefully review the information contained in the notification email, particularly the dispute type. You may be given the option to contest or concede the dispute. If you accept responsibility for the dispute, choose Concede. The funds won't be returned to your Chase bank account.
If, however, you challenge the dispute, you need to provide supporting evidence that the good or service that you agreed to provide to the customer was carried out as intended. Please consult the guide below to determine what documents you need to send for the most common dispute types.
From the day that you receive your dispute notification, you'll have five (5) business days to send your evidence. This window ensures that Chase has sufficient time to present the evidence to the cardholder’s bank and/or card network within their allocated timeframes. We evaluate late submissions on a case-by-case basis and send accordingly.
Once you have gathered all of the documents, choose the Contest button and upload your documents. Please keep in mind that there are size limitations on files, so you may want to send screenshots. For instance, if you send your refund policy but the file size is too large, take a screenshot of the page with the cardholder’s signature. Chase currently accepts JPG, JPEG, TIF, TIFF, PNG, and PDF (preferred) files. For each dispute, send up to five files, 1 MB per file. If you have multiple picture files that exceed the combined size limit, compress each individual file and upload again.
Once Chase receives your response and supporting evidence, we'll challenge the dispute with the cardholder’s bank on your behalf. If you win the dispute, Chase releases the disputed funds back to your bank account in the next settlement and your confirmation will be sent. Due to timelines for card networks and issuing banks, the dispute can take up to 45 days to be resolved.
Fees & Pricing